Making Numbers Bigger

Since Tally Pal PD (working title) will not have graphics per se, only text, I need to dive into the Playdate’s font system. Playdate uses bitmap fonts, which makes sense for a monochrome system, but they can’t be scaled smoothly like a regular vector font. Large number characters are need for the count display, so a custom font will be required.

Happily, Panic has created an online font editor, Playdate Caps: https://play.date/caps/

Drawn by hand, or mouse really.

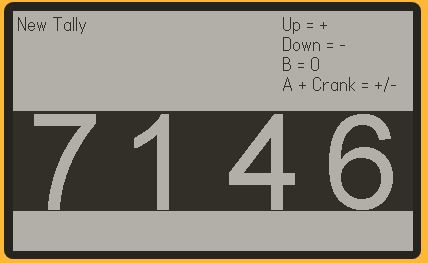
The Playdate’s screen is 400 pixels wide, and there is no need for a screen safe margin at the edges, so for a 4-digit number, 100 x 100 pixels on a monospace (every character the same width) font would make a perfect horizontal fit. At first I just hand-drew a quick and dirty giant font to test the process, and it was surprisingly easy to export, load and see on the screen in a matter of minutes.

One glyph at 100×100 pixels is 10,000 pixels. I don’t think mouse drawing will produce a good result.

The goal is a flat, hi-res look, so hand drawing or scaling up an existing font are out, and I wouldn’t be able to achieve that look in Caps without a lot of tedious clicking. So instead I just put marks to indicate the edge and center of each glyph and exported it as separate font and bitmap files. Only the digits 0-9 will be used, which makes things easier as well, as odd as it seems to create a font with no letters.

I opened up the bitmap in one copy of Paint and opened a blank image in another, set the second one to monochrome and typed out the characters 0-9. Then it was simply a matter of copying them over and using the alignment marks in the bitmap to place them. After a little extra cleanup on artifacts and removing the marks, voila I had a giant bitmap font.

Final step is to re-import the font to Caps and invert black and white, then export it once more as an all-in-one font the Playdate can parse. Now I have white characters on a black background, just like the little tumblers in my mechanical counter.

Looking slightly more intentional now.

Cranky

Development remains slow after trying to fit time for it into a surprisingly busy schedule. Happily the only deadlines I have are the one I impose upon myself. A weekly update seems a reasonable pace, and here is the next one.

The Taito DS Paddle Controller in white.

The crank was the primary draw to the Playdate for me. Rotational controls are rare on consoles. The Atari 2600 had probably the most widely-known paddle controller, and the latest official paddle controller I’m aware of is the one for Nintendo DS that Taito produced, and that was only released in Japan. Thumbsticks can approximate rotational control, but they’re not ideal for it.

So here on the Playdate we have, not a paddle, knob or dial, but a crank, and to my knowledge the first time I’ve seen a crank used as a video game control. My first thought upon seeing it was that it might be used to charge the Playdate’s battery, like it’s a wilderness survival console. This is unfortunately not the case, but it is still a unique control that opens up some fun interaction possibilities.

Photo of a standard yellow mechanical tally counter with the parts labelled.
This looks just like the one I keep on my desk except that it’s yellow. Seemed an appropriate color for this post.

On a standard mechanical tally counter, twisting the knob on the side advances all four tumblers. This can be used to to quickly reset the count to 0, or technically it can also be used to assist with setting the count to a specific amount, but the user would still need to use the plunger to fine tune the number by 1’s.

With the Playdate’s crank I can provide a way to rapidly change numbers with ease and also at a finer level than 1,111 at a time.

Unlike a dial, a crank is easy to turn by accident when it is open, and in order to stow it, one must rotate it into the correct position, so I can’t simply have the crank alone drive setting the count. In order to have the user only change the count deliberately when using the crank, they must hold the A button while cranking in order to engage it.

My first attempt used playdate.getCrankTicks(ticksPerRevolution), initially with a value of 10, which advanced the counter by 10 for every complete rotation. This worked well enough but required a lot of tedious cranking to set the count to higher numbers. However, setting getCrankTicks() to a much higher amount turned out to pass multiple ticks in a single frame if I spun the crank fast enough. Fortunately the ticks queue up so the number comes out correct in the end, but after spinning the crank very quickly, the count would continue to catch up after stopping. I want the crank to feel as though it is driving the count mechanically, so having it continue to count when not physically rotating the crank doesn’t do the trick.

A screenshot showing the current state of development. Who needs fancy shaders, or any graphics for that matter?

Fortunately, the SDK provides a number of ways to determine what the player is doing with the crank, so next I plan to try using playdate.getCrankChange(), which simply returns how much the crank has changed since the last time it was called, and calculating the angle-to-number value manually instead of relying on the crank passing fixed positions. This should feel more like the crank is driving a gear that can be engaged at any arbitrary point.

I’m not back on it. I’m still on it.

After having unfortunately been the target of my first workforce reduction in many years, I feel compelled to update my blog once more. Here it is, an update!

I’m working on a project for the PlayDate console.

Maybe it’s a bit of an extreme change, going from full-body motion tracked virtual reality environments to a tiny monochrome handheld (the entire console is smaller than the cartridges for some I’ve owned), but I really enjoy working within unusual restrictions, as well as unusual input methods, and build/deploy times of about 5 seconds is a breath of fresh air from needing to literally suit up to test changes. The first games I ever developed were in black and white, so it seems fitting to return.

My first project, to learn about Playdate development and more advanced Lua scripting, is very similar to the one I used to familiarize myself with iOS development, Swift, and Xcode respectively: Tally Pal! (2?) The Playdate’s crank control corresponds nicely to the dial on mechanical tally counters, so it seemed a fitting choice. Also, it’s not especially complicated. Although, if the previous version is any indication, I’m sure I’ll find ways to make it extra.

So far I have set up my development environment and a version of source control more sophisticated than my past “save a copy on a USB stick when it reaches a stable version” method.

Of course, because I have a suspicion that studios won’t be clamoring for developers familiar with a boutique console, I’m also trying a few experiments in Unity VR. Unreal has been my engine for the past few years, so it’ll be good to refamiliarize myself.

No promises on an update schedule. I have no illusions of a dedicated readership that has been patiently awaiting new posts and this blog is mostly a method to organize my own thoughts, but if there are any updates, this is where they will be found.

Hiatus

Since July of last year, I’ve been working full-time in the VR industry, so my development for mobile VR is on hold, as is this blog. However, I’ve begun building a home machine and space for room-scale VR. Once that’s all up and running I hope to document my next forays in development.

In the meantime, if you have an interest in the state of VR, I recommend the Voices of VR podcast.

If you have an interest in Unity development, try the Debug Log podcast.

Google Cardboard View-Master Devkit Modification

I have found the Hasbro View-Master VR to be a very serviceable Cardboard device. The fact that it simply flips open without any velcro and that it’s not made of literal cardboard are big plusses, and the face-gasket is rubberized, which borders on actually being comfortable.

However, it does not feature any openings for earbud or data cables, understandably as it’s meant to be light-tight, and most users probably aren’t using it while hooked up to their computers. When developing on Cardboard with a dedicated test device, it’s nice to be able to test any VR apps as they are meant to be used, in a Cardboard device, so I decided to make a quick modification to not only allow a data cable to remain connected while it’s closed, but also add in a port for earbuds.

IMG_2380

I have set mine up for an iPhone 5. Naturally the placement of any cuts may differ for other mobile devices. Also note that depending on how closely your cuts conform to the shape of your cables, there may be a little light leakage from the new holes. However, I was pretty loose with my cuts and still find the leakage to be negligible, especially considering that one’s right hand is typically covering the holes when using it anyhow.

Tools you will need:

  • Phillips Screwdriver
  • Dremel
  • Safety Glasses
  • Marker

Optional:

  • Vise
  • Small File
  • Tissue/Paper Towel

First separate the halves of the View-Master by removing the four screws that hold the hinge in place. This will make operating on the device halves much easier.

IMG_2382

Plug in your cables while your mobile device is mounted in the View-Master if possible to see where the cuts will need to be made. If the cables cannot be plugged in while the mobile device is in the View-Master, lay the cables over the ports to eyeball it.

IMG_2378

Use a felt marker to indicate the size and location for the holes. You may notice at this point that the inner lip of the front half is made of rubber, while the rest of the device is plastic.

IMG_2381

Fit the two halves back together  and use the marks on the front half to see where to draw aligning marks on the outside of the back half, which should be roughly the size of a cross-section of the cables themselves.

IMG_2383

Separate the halves again. If you have a vise handy, use it to hold the View-Master. You may wish to also use a tissue or paper towel to cover the inside of the device to prevent bits of rubber or plastic from falling into it.

Using your Dremel and pretty much any cutting disc, carefully carve away the rubber lip where indicated by the marker. Try cutting it a bit smaller than the cable’s width at first, since the rubber can stretch to accommodate the cable. Do not cut into the white plastic unless necessary to accommodate your cable placement.

Do the same for the red plastic outer lip on the back half. This cut would benefit from being slightly larger than the cable to reduce the possibility of pinching it when closing the device. I also beveled the edges of mine a bit to further reduce the chance of pinching.

IMG_2385

You may want to use a small file to get rid of the hanging bits of plastic and smooth or shape the edges.

Repeat this process with the earbud hole (I had to simply carve away the side of the rubber lip a bit to fit this cable). Screw the two halves back together and you’re done! Your very own View-Master brand Google Cardboard dev kit!

Hope that helps anyone trying to come up with a decent Cardboard development solution. I’m finding that it’s saving me a fair amount of time on iterations the long run not having to open the device or fiddle with cables. I can also use it to view other VR apps with earbuds to boot.